Export your domain

To export your domain, you will first have to create a backup of both the files in your domain and the databases that your domain draws from.  First, click on the ‘Manage Your Account’ menu at the top of your screen and select ‘Migration Information.

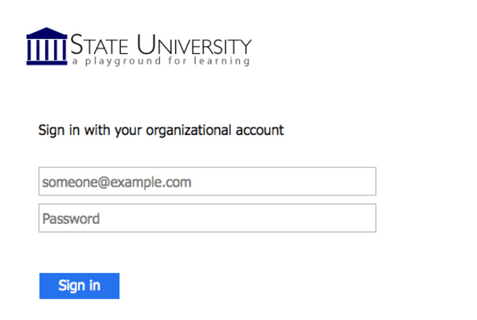
  1. To get started you’ll need to log in to your control panel (https://digitalscholarship.brown.edu/dashboard) using your Brown University username and password.
  2. Once you’re logged in, you’ll see the cPanel interface.  Now click on the Manage Your Account menu at the top of your screen and select Migration Information.
  3. To create a backup of your files and databases, simply click the button labeled Add Backup. The system will take a moment to create a backup. When it is complete, you will see the new backup appear below the button. You can click on this backup to download the file.

WordPress Export/Import

If you are using WordPress, you can also get an export of your posts, pages, comments, custom fields, categories, and tags.

The WordPress export is great for saving the content of your WordPress site so that you can import it into another WordPress host, such as WordPress.com or WordPress.org.

Note: Exports do not include plug-ins, or other site customizations.

Exporting

  1. From the Dashboard navigate to Tools>Export
    The screenshot below shows how to export all of your posts, pages, comments, custom fields, terms, navigation menus, and custom posts. However, you can also export just certain posts, pages, or media. The export page within WordPress

This export process generates an XML file of your blog’s content. WordPress calls this an  eXtended RSS or WXR file.

Note: This will ONLY export your posts, pages, comments, categories, and tags; uploads and images may need to be manually transferred to the new blog. If possible, do not delete your blog until after media files have successfully been imported into the new blog.

Importing

Once you have exported your posts, pages, etc., you can import them into your new WordPress site.

  1. Log in to your new WordPress.com or self-hosted WordPress site and go to the Dashboard.  From there navigate to Tools>Import and click on the link to “Run Importer
    Screenshot showing where to find the WordPress Importer
  2.  Next you will see a screen that prompts you to upload the WXR (.xml) file you generated through the export process. Browse to your exported WordPress archive and then click the “Upload file and import” button.
    Upload file and import
  3. Choose and upload your file.  You will then be prompted to assign an author to the posts that you are importing.  You can use this function to assign one author to all posts, or you can manually set the author for each post in the posts menu. Unless you have a space limit, you will also want to select the option to “download and import file attachments” before clicking the “Submit” button.
    Select desired import options and click the
  4. When your import is complete, you will see a confirmation screen.
    Confirmation screen

Your exported content is now added to your site. If you had posts on your site prior to importing, those posts are still available.

Because the export did not include themes or plug-ins, you will need to reinstall those separately from the export/import process.

Setting Up FTP

There may be times when you need to upload files to your website in the Digital Scholarship at Brown web hosting environment. There are a number of scenarios when this might be necessary:

  • You’re working with an application that allows you to install plugins/extensions, but the files need to be manually added to your file manager in order to install them. (Note: This is not required for WordPress which allows you to install themes/plugins through the WordPress dashboard.)
  • You’ve developed a custom site/pages using a web design program, and you need to upload the files you created to your file manager
  • You’re installing an application that isn’t part of applications list in Installatron.

One way to upload files is by using the File Manager that is part of cPanel. However, sometimes you’ll find it easier/necessary to use File Transfer Protocol (FTP) to move files to your site. This can be particularly useful if you’re working with a web space where you’re not the owner (so you don’t have access to the File Manager in cPanel) or if you need to provide file access to someone else to your space on the web server. File Manager also only allows you to upload files one by one, so if you’re working with large amounts of data then FTP will be preferable.

What exactly is FTP?

File Transfer Protocol is a method that allows you to remotely move files to a web server from another location – usually your local/personal computer. Using a pre-defined FTP account (with a username and password), you can configure an FTP client (a program you run on your computer that allows you to transfer files via FTP.

There are lots of FTP clients that you can use; some are free and some are not. The following are available on http://software.brown.edu:

  • FileZilla (Mac & PC)
  • CyberDuck (Mac & PC)

For the purpose of this tutorial, we’ll show you how to set up FTP in FileZilla, (Cyberduck instructions can be found here) but you should be able to generalize these instructions to use in any FTP client.

Get Information about Your FTP Account

If you’re connecting via FTP to your own space on Digital Scholarship at Brown, or if you’re setting up an FTP account for someone else to use, you’ll need to start by getting the proper FTP credentials from cPanel:

  1. Log in to digitalscholarship.brown.edu.
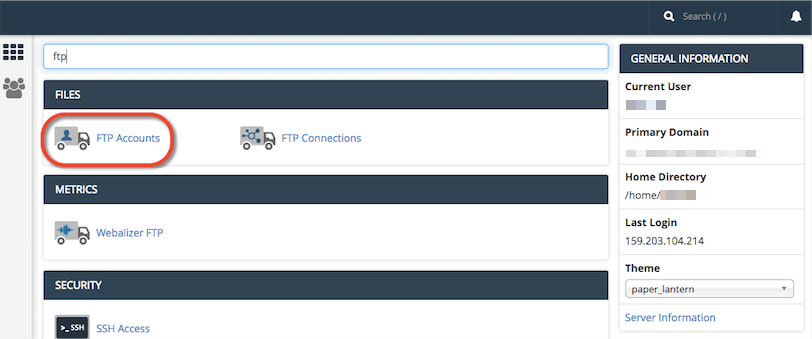
  2. In the Search Box at the top of the page, search for “FTP”, and click the FTP Accounts icon that appears.
  3. Every cPanel has an FTP account by default, and you can find those credentials by scrolling down on the FTP Accounts page. You also have the option to create a new FTP account, which can be done by filling out the Add FTP Account form with a username and password. Unless you change it, the new FTP account will be limited to a directory with the same name as the account you’re creating. You can change this to a different directory, if you want to grant this account access to a different location.  NOTE: Make sure you know/remember the password you enter. When you’re done, click Create FTP Account.
  4. Once you’ve created the new account, you’ll see it appear in the list at the bottom of the FTP Accounts page. In addition to any accounts you’ve created, in the Special FTP Accounts section, you’ll see the default FTP Account. You’ll know this account because the username corresponds to your cPanel username. This FTP account has full privileges to access all directories within your cPanel.
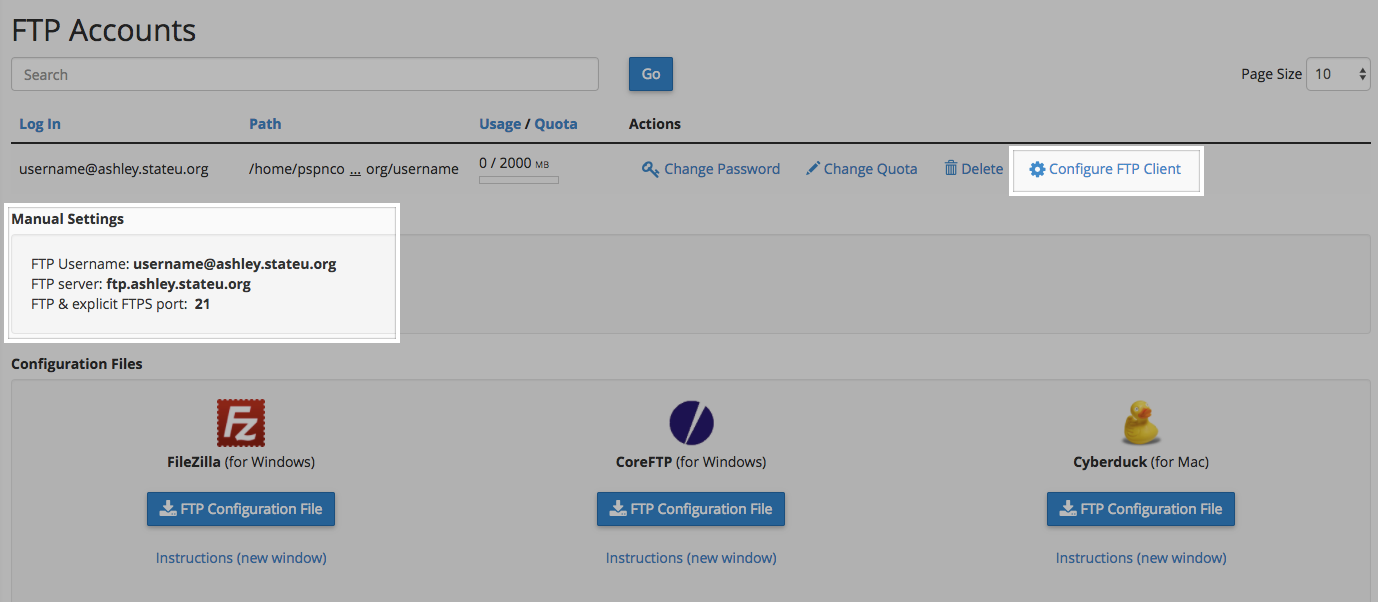
  5. For whichever account you need credentials for, click the Configure FTP Client link.
  6. Write down the username, server, and port information that appears. You will need to use this (or you will need to provide this to the person you are giving FTP access) along with the password you created in Step 3 in order to configure your FTP client.

PLEASE NOTE:

For cPanel’s default FTP account, use the following settings:

-Connect via SFTP (more secure than FTP)
-Port: 22

For an FTP account that you manually created (shown in Step 3 above), use the following settings:

-Connect via FTP (cPanel doesn’t allow an SFTP connection for manual accounts)
-Port: 21

Configure FTP in Your FTP Client

Below are links to tutorials for setting up both FileZilla and CyberDuck to connect to your FTP account.

For further assistance on FTP, read this guide.

Map Your Domain to Tumblr

Mapping your domain is an important part of digitalscholarship.brown.edu; it reinforces the idea that you don’t necessarily need to host all your own applications. You should, however, be mindful of making your web presences part of a domain you control. If you would like to map a subdomain and have not yet created it, use this tutorial on creating subdomains before proceeding. To map your domain, or a subdomain, to Tumblr, use these steps:

  1. Log in and navigate to your cPanel. Click the Search box at the top, right-hand corner and type “DNS” (without the quotes). As you type, the cPanel page will begin to narrow down results.
  2. Find and click on Zone Editor to continue.
  3. Find the domain, or subdomain, you want to map to Tumblr in the list of Zone File Records. Click Manage next to the proper domain.
  4. Leave the Name, and TTL fields set to their defaults. Update the Type drop-down menu to CNAME, and the Address field to domains.tumblr.com. Click Edit Record when you are done.
  5. Visit the Tumblr website, and login with your Tumblr username and password.
  6. After logging in, click the Tumblr Settings icon.
  7. For the Tumblog you’d like to use under the Username click the pencil icon to edit these settings.
  8. Check the Use a custom domain checkbox. Type the name of the domain or subdomain you want to map to Tumblr into the box, then click Test your domain.
  9. If your domain mapping was successful, you’ll see a message that your domain is now pointing to Tumblr. Click the Save button before leaving the page. Keep in mind that it may take up to 72 hours for your domain or subdomain to correctly point all visitors to the correct location.

What Exactly Is a Web Application?

In the most general terms, a web application is a piece of software that runs on a web server. A web server is a specialized computer designed to host web pages.

Many web applications are comprised of two components: files and a database. When you install a web application, you will need to make sure all of the files are copied over into the appropriate location AND that a database (and database user account) has been set up to connect to those files. Often, you will have to do some configuration to make sure the application knows how to access the database.

The system we use for this web hosting space uses a special script installer called Installatron (in cPanel) that allows you to automatically install dozens of open source applications. When you use Installatron, you don’t need to worry about moving files, creating databases, or doing the initial configuration. It’s all taken care of for you.

Digital Scholarship at Brown is configured as a LAMP server, so web applications have to be able to run under this type server. Occasionally, a web application may require additional components or modules that need to be installed on the server.

What Can You Do with Your Account?

Your ability to do things on this webspace is dictated to a large degree by the limits of your imagination (and Brown’s policies). That said, there are some technical requirements and limitations that you should review.

Here are some ideas that might help you get started:

Install a Web Application in Your Space

This hosting space makes it very simple to install certain web applications in your cPanel account. Web applications are just special software that run on a web server. Usually, they allow you to build and manage a website. The kind of site you can build depends on the type of application you install. Here are some examples of applications that you can easily install within the digitalscholarship.brown.edu web hosting interface:

WordPress: WordPress is a simple-to-use blogging application. The tool also comes with a huge array of plugins and themes to allow you to create virtually any kind of website imaginable.

""

Omeka: Omeka is an open source web application that can be used to create and display online digital collections and archives.

Scalar: Scalar is a content management system (CMS) that enables the creation of media-rich, non-linear, digital books.

Grav: Grav is an open source, flat-file CMS made for folks who are looking for something a little more experimental. Grav provides a straightforward framework for creating pages and inserting media.

Mediawiki: It is the open-source wiki software that runs the online encyclopedia, Wikipedia. This tool may be right for you if you’re interested in publishing documents and then collaborating with others on them.

These are just a few of the open-source applications that are available to you in your hosting space. We encourage you to read more about what web applications are and which ones are available to you through this project. Digital Scholarship at Brown provides shell access, and it is possible to install some other software, but this is not a bare server like AWS or Digital Ocean. Please discuss this with CDS staff before trying it. cds_info@brown.edu

Organize Your Site with Subdomains and Folders

Through this project, you’ve received a domain name that you can actually subdivide and organize anyway you like. One easy way to organize your domain is to create subdomains, in which you can then install other applications. More simply, you can set up subfolders for your site (which can also have their own applications installed in them). The table below provides examples of how you might organize your site using the subdomain vs. the subfolder approach.

Subdomain Approach Subfolder Approach
yourdomain.com (“root”) Install WordPress as your “main site” yourdomain.com (“root”)
course1.yourdomain.com Install a second WordPress instance for a course you’re taking. yourdomain.com/course1
photos.yourdomain.com Install ZenPhoto for a public photo gallery of your photos. yourdomain.com/photos
docs.yourdomain.com Install MediaWiki for a club you belong to that wants to collaboratively edit its bylaws. yourdomain.com/docs
files.yourdomain.com Install OwnCloud so you can access your files on your laptop and at work. yourdomain.com/files

There is no one solution to this challenge of organizing your installed applications. What you do should be driven by what makes sense to you. To start, you may want to install one thing at the root of your domain, and then let the rest evolve as you learn what’s possible. Note that any subdomain that you create adds a fourth level to the name of your site: subdomain.yourname.digitalscholarship.brown.edu.

Map Your Domain (or a Subdomain)

If you already have a digital presence that you’d like to pull into your hosting space, domain mapping is an option you may wish to explore. This allows you to assign your domain (or a subdomain) to another service. Some services that work with domain mapping are:

When you map a domain, users who visit your URL will automatically see your space on one of these services. It’s a great way to incorporate your activity elsewhere into your domain, and it might be a good first step if you’ve already established a presence somewhere else and just want to point your new domain to that space.

Privacy

What you add to your webspace rests entirely with you (within Brown University policies as outlined in the Guidelines for use). You can choose not to pick a domain that reveals your name. You can use a pseudonym on your actual site. However, when you sign up through the default process, your name does get published as part of the public record about your domain name. Anyone can find it by looking up details about the ownership of that domain name through a public “Whois” request.

This is NOT an issue if you’re already planning on using your name openly on your site (in your domain name or elsewhere). This option is aimed at those who, for whatever reason, feel they want to take every precaution to hide their identity on their site.

Understanding Accounts & Passwords

One aspect of this web hosting world that users may find complicated are the different accounts (and associated passwords) that you can manage as part of your participation. This section outlines the types of accounts that you are likely to have, what they are for, and how you go about resetting passwords on each of them.

Your cPanel Account

When you first sign up for your domain and hosting, a cPanel account will be generated that provides you with access to your slice of the web server. Your cPanel account is automatically associated with your Brown username and password. Therefore, your Brown username and password will grant you access to your cPanel account.

Your Application Administrator Accounts

Every time you install a new application in cPanel, an Administrator Account for that application will be created. You will likely use these accounts very often – every time you need to log in to your application to manage the associated website, you will use this account.

For example, if you install WordPress to manage your website, every time you need to add content to WordPress, change your theme, approve comments, etc., you will use this account to log in.

Usually, you will be given the opportunity to choose the username and password for that account. We recommend choosing something that you are likely to remember but that is strong and secure. Do not use your Brown username and password for these applications.

Upon installation, you will likely receive an email confirming the username/password combination you chose. It will also have information about how to access the login page for that application. It’s a good idea to keep this message.

Depending on the application you’re working with, managing and resetting the password for this account will vary. If you’ve used Installatron (in cPanel) to install the application, however, you can always review the account credentials:

  • Log in to cPanel
  • Find the application you installed under My Applications.
  • Click the Edit button (this looks like a blue wrench).
  • Scroll down to find the Administrator Username and Password.

In addition, most applications should have some kind of password reset link on the login page. For more information on resetting your application password through Installatron, click here.

Other Types of Accounts

In addition to the account types outlined above, there are a few other kinds of accounts you may have as part of this project:

  • When you sign up for a subdomain/top-level domain, cPanel will automatically create an FTP (File Transfer Protocol) account for you by default. FTP is a fast and convenient was to transfer large files online. You’ll also have the option of manually creating your own FTP account.
  • Application User Accounts: In addition to the Administrator Account that you set up when installing an application, most applications will also let you set up user profile accounts within each application.

Signing Up

Review the Guidelines

Before you get started, we recommend that you review our information about Choosing a Domain Name.

The Sign-Up Process

Once you’ve reviewed the guidelines, you can proceed to the sign-up page.

  1. Click the “Create” button
    Image of Create button on Landing Page
  2. You will be redirected to log in for verification. You will use your Brown username and password to log in.
  3. You are now ready to create a domain. To start, you must first sign up for a free subdomain (i.e., yoursite.digitalscholarship.brown.edu). Directions for purchasing a top-level domain (i.e. yourdomain.com) will be provided further down.

Option 1: Free Subdomain (Recommended)

For no cost, you can create a subdomain of digitalscholarship.brown.edu. This is the recommended way to proceed.

To create a free subdomain of digitalscholarship.brown.edu, leave this default option selected and enter the subdomain name you have chosen for your web presence. When you’ve found an available subdomain, click the  Continue button. For example, if you choose “yourdomain” as your subdomain, your full domain would be yourdomain.digitalscholarship.brown.edu.

Confirm that you like the name you selected. If you do, click the Sign Up button. (If not, click the Start Over button, and repeat the above step.)

You should now see a screen confirming that your subdomain is ready. After a few seconds, you will see the regular cPanel options.
Option 2: Buy a Top-Level Domain from Reclaim Hosting

It is easy to create your own top-level domain (a .com, .net or .org address). This allows you to select a URL for your website that is easy to remember and share.

While you are at Brown University, this is available for a nominal cost (currently $15/year). You can continue to use this domain after leaving Brown, although the cost may increase.

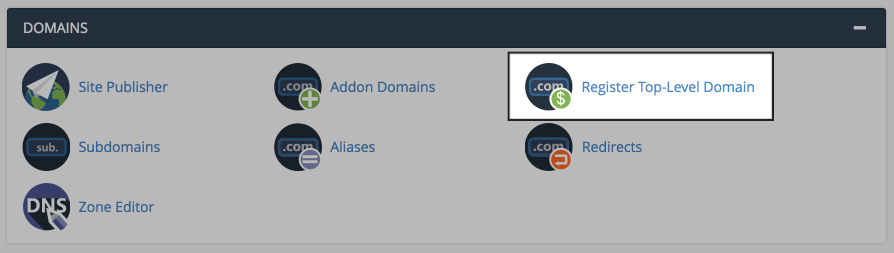
To register a top-level domain, log into your newly created cPanel, navigate to the Domains section, and click Register Top-Level Domain.

This panel offers a step-by-step guide to registering and adding a new top-level domain to your cPanel account.

Option 3: Connect an Existing Domain to Your cPanel

If you already have an existing domain that you’ve previously registered elsewhere, simply point your domain’s nameservers to ns1.reclaimhosting.com and ns2.reclaimhosting.com.

Choosing Your Domain Name

Choosing your domain name is the first step in getting started with staking your claim on the web. Your domain name is a unique web address (e.g. yourname.digitalscholarship.brown.edu) that can be used to build out your own digital presence. As you make your choice, there are a few considerations to keep in mind:

Your domain name must be available. Domain names must be unique, which means in order for you to claim your own, you need to be sure that it is currently available (and not being used by anyone else or any company or organization). There are many tools to check on domain availability; and the system checks your selection when you sign up for an account. If you’d rather spend some time thinking about your choice, you can always check domain availability here: whois.com.

Choose a domain you can live with. You should choose a domain name that you feel you can live with for quite some time. You should pick something that you won’t find embarrassing in the future. A good rule of thumb is to pick a domain that you would be comfortable putting on a future job application.

You may wish to include your name in your domain. There is no requirement that your domain reflects your specific identity in the form of your first and last name. However, choosing a domain name that includes your name may make it easier for you to achieve higher rankings in search engines when someone queries your real name.

Pick a domain you like. Your domain should reflect your work. It can reflect your research interests, projects, or it could simply be your name. The “right” domain for you is the one you’re comfortable with. If this is to be used for a project, you may want the domain name to represent the project.